reacTIVision and Logic Pro X.
Information from reacTIVision can be converted and used to control plugin parameters in external applications like Logic Pro X. Before data can be sent from Max it needs to be converted into Midi information. Midi information can be scaled into note numbers, which range from 0 to 127, known as the Midi note scale (Inspiredacoustics, 2019). Once data from reacTIVision has been scaled to the Midi note number scale, it can be sent from Max using noteout and ctlout objects, by being assigned to a specific Midi channel and controller number (Cycling74, 2019). This information can then be received and routed in Logic Pro X (see Fig.6.1.). Using the Midi environments window, within Logic Pro X, allows users to have a virtual view of the Midi studio, allowing control over Midi setup and routing (Apple Inc., 2019).

Logic plugins are controlled by fader values and any incoming data from Max needs to be converted into a fader value. The fader values Logic uses are the same as the Midi note scale (0 to 127). This can be done by using a fader after the physical input within the environments window (see Fig.6.2.). This fader can be used to convert incoming data from a control data type to a fader data type (J. Simon Van Der Walt, 2012) (see OneDrive video > reac_Logic_Control….mov).

References.
Apple Inc., 2019. Logic Pro X: Environments overview. [Online] Available at: https://support.apple.com/kb/PH13245?locale=en_US [30/042019].
Cycling74, 2019. ctlout Reference. [Online] Available at: https://docs.cycling74.com/max5/refpages/max-ref/ctlout.html [29/04/2019].
Cycling74, 2019. noteout Reference. [Online] Available at: https://docs.cycling74.com/max5/refpages/max-ref/noteout.html [30/04/2019].
Inspiredacoustics, 2019. MIDI NOTE NUMBERS AND CENTRE FREQUENCIES. [Online] Available at: http://www.inspiredacoustics.com/en/MIDI_note_numbers_and_center_frequencies [01/05/2019].
J. Simon Van Der Walt, 2012. Max to Logic Part 1.mov. [Video Online] Avilable at: https://www.youtube.com/watch?v=8nHpYZkgi1A [29/04/2019].
J. Simon Van Der Walt, 2012. Max to Logic Part 2.mov. [Video Online] Avilable at: https://www.youtube.com/watch?v=mA3-vTIpkXQ [29/04/2019].
Reac Mix Table Demo.
OneDrive link to Max patch and video demos;
The above link should include the following;
1 – Max patch for the table. Main patch filename = reac_build_main.maxpatch
2 – reacTIVision framework. Own file named = reacTIVision- 1.5.1-mac64
3 – Video discussing patch build. Filename = reacTable Patch Talk….mov
4 – Video of mix using table. Filename = reacTable Recording Demo….mov
5 – Video of using reacTIVision to control Logic Plugins. Filename = reac_Logic_Controller….mov
Patch Built! Audio Mixing Table.
After establishing how to control different plugins using reacTIVision, the next process was to turn my table into a surface which could be used for audio mixing. The first main issue, that I encountered, was with marker placement. With the amount of markers being used, many of which work in a similar way to one another, at first using similar scale ratios, they all ended up bunching in the same area of the table. To make the best use of the tables space, also providing a ruff outline where to place markers, I marked out a basic user interface upon the clear table top (see Fig.5.1.). Once the outline of a user interface had been set, the scale objects could then be used to map the input values, relating back to a certain area of the tables surface (Cycling74, 2019).

The plugins work with the following markers in the following ways;
X floating point data (Left = 0.99 Right = 0.01).
Y floating point data (Top = 0.01 Bottom = 0.99).
Rotation floating point data (0.01 to 6.27).
Fiducial markers used;
56 – Master Control – Turns on main DAC objects, Starts playback on all buffers from 0ms (Object Update and Remove Object data) and is a master output volume control (Y data) (see Fig.5.2.).

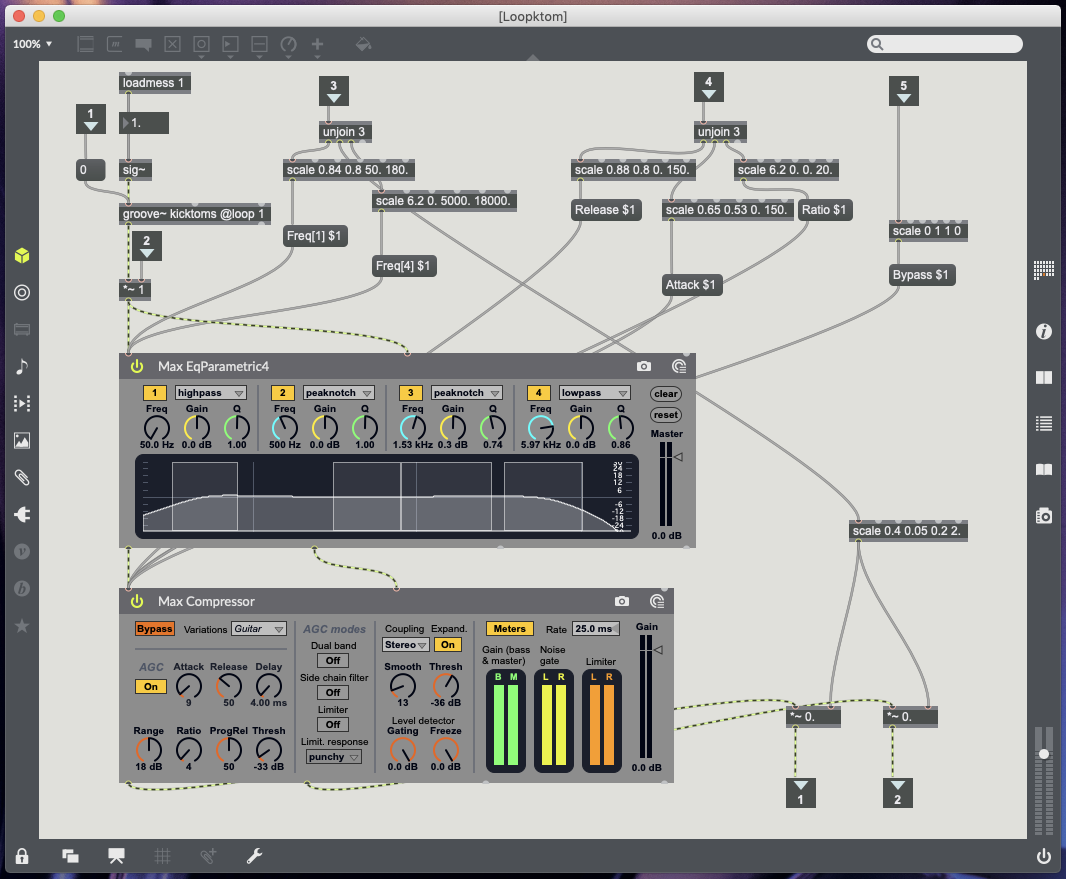
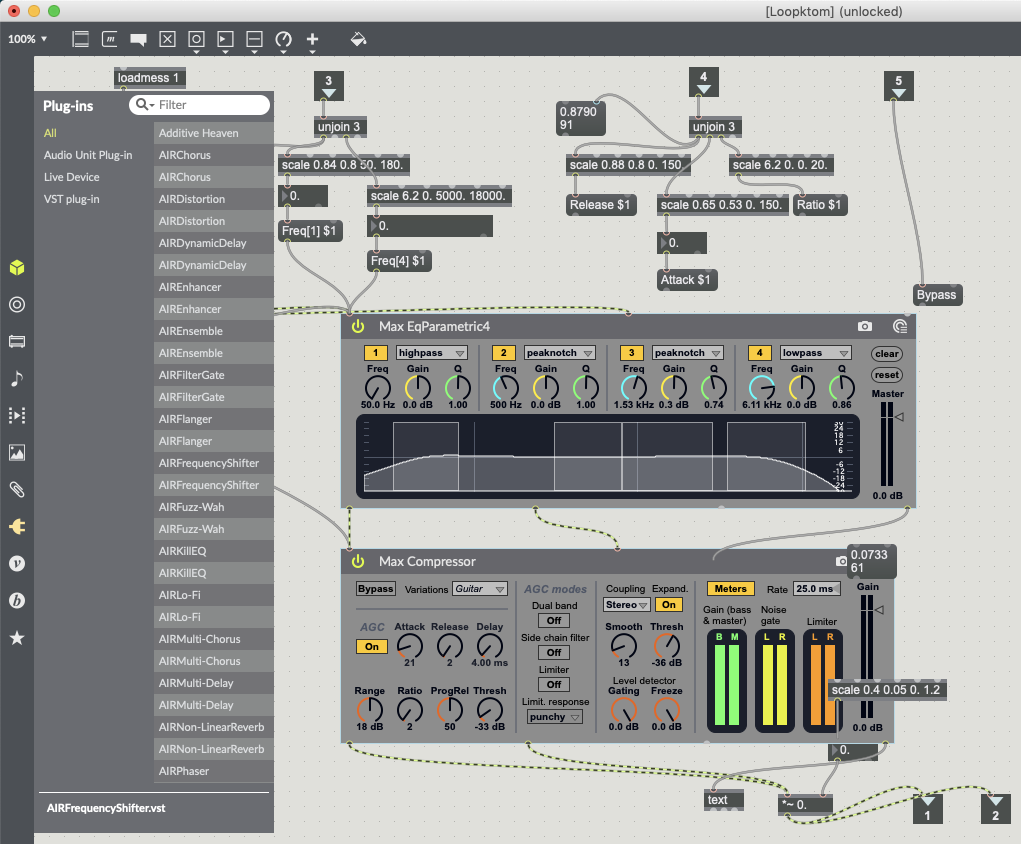
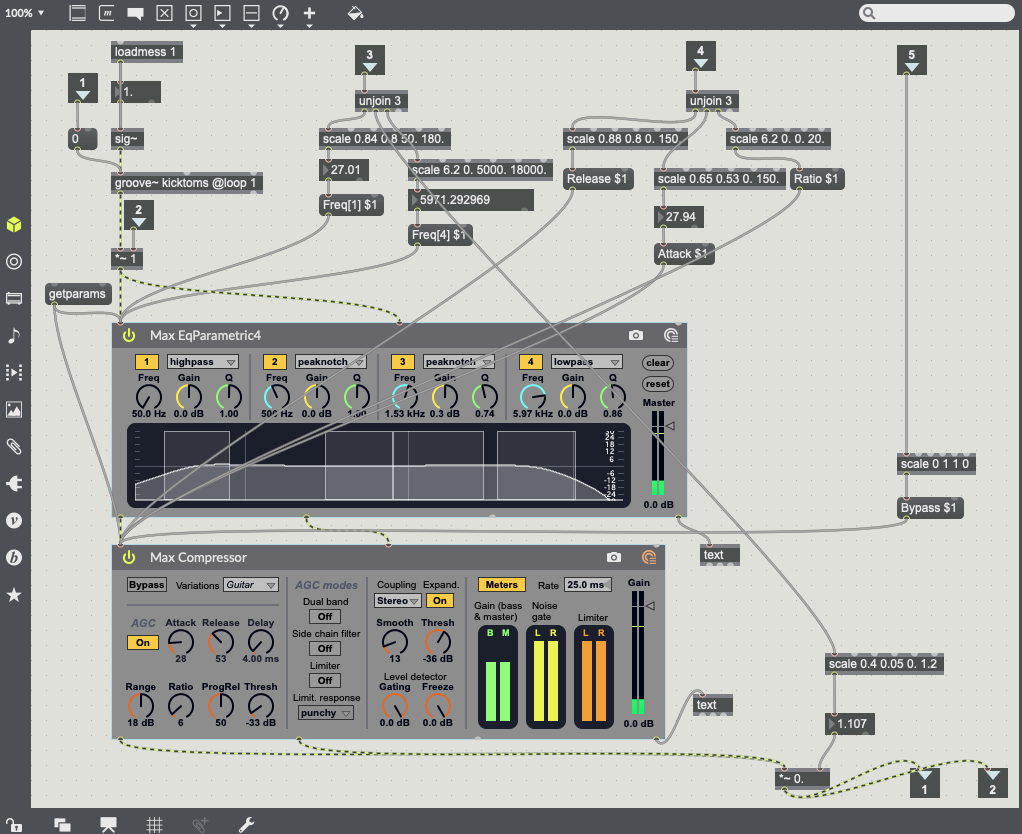
44 – Kick and Toms – Update Object sends 1 to volume to turn mute off, Remove Object sends o to volume to turn mute on (post Groove object pre plugins), X data controls high pass EQ (50Hz to 180Hz), Y data controls volume, Rotation controls low pass EQ (5000kHz to 18000kHz) (see Fig.5.3.).
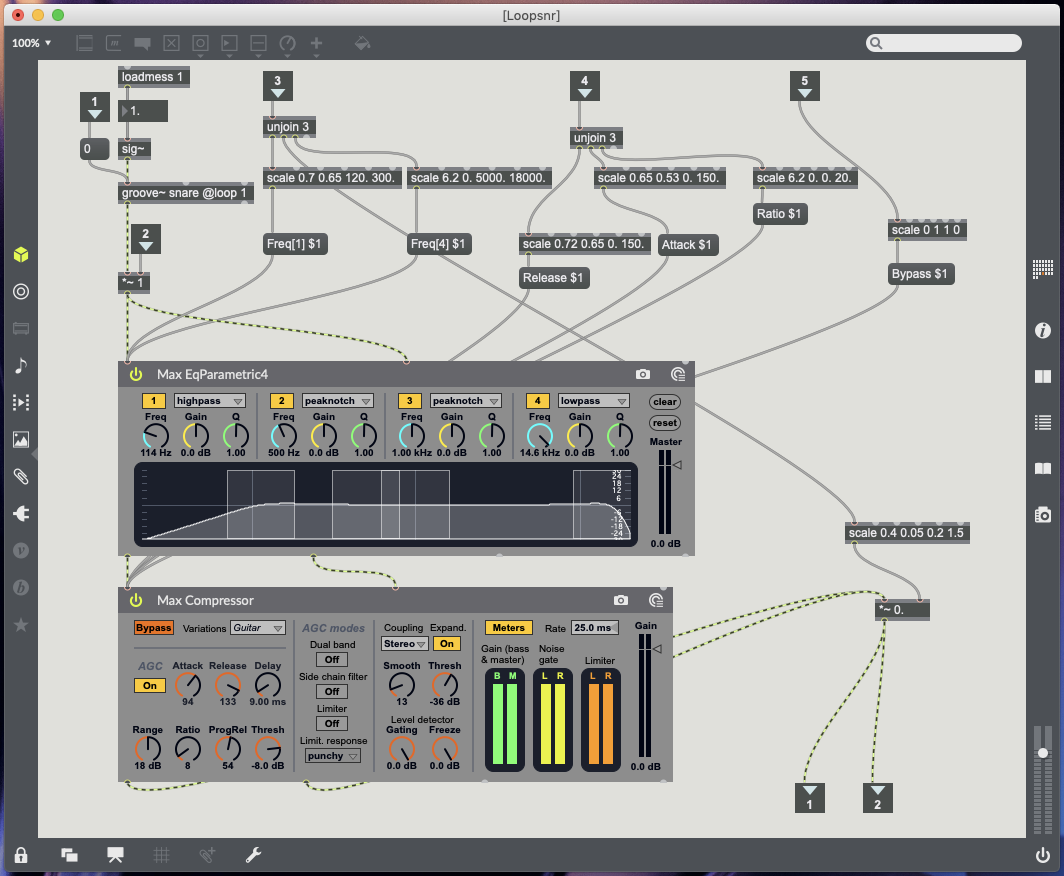
20 – Snare drum – Update Object sends 1 to volume to turn mute off, Remove Object sends o to volume to turn mute on (post Groove object pre plugins), X data controls high pass EQ (120Hz to 300Hz), Y data controls volume, Rotation controls low pass EQ (5000kHz to 18000kHz) (see Fig.5.4.).
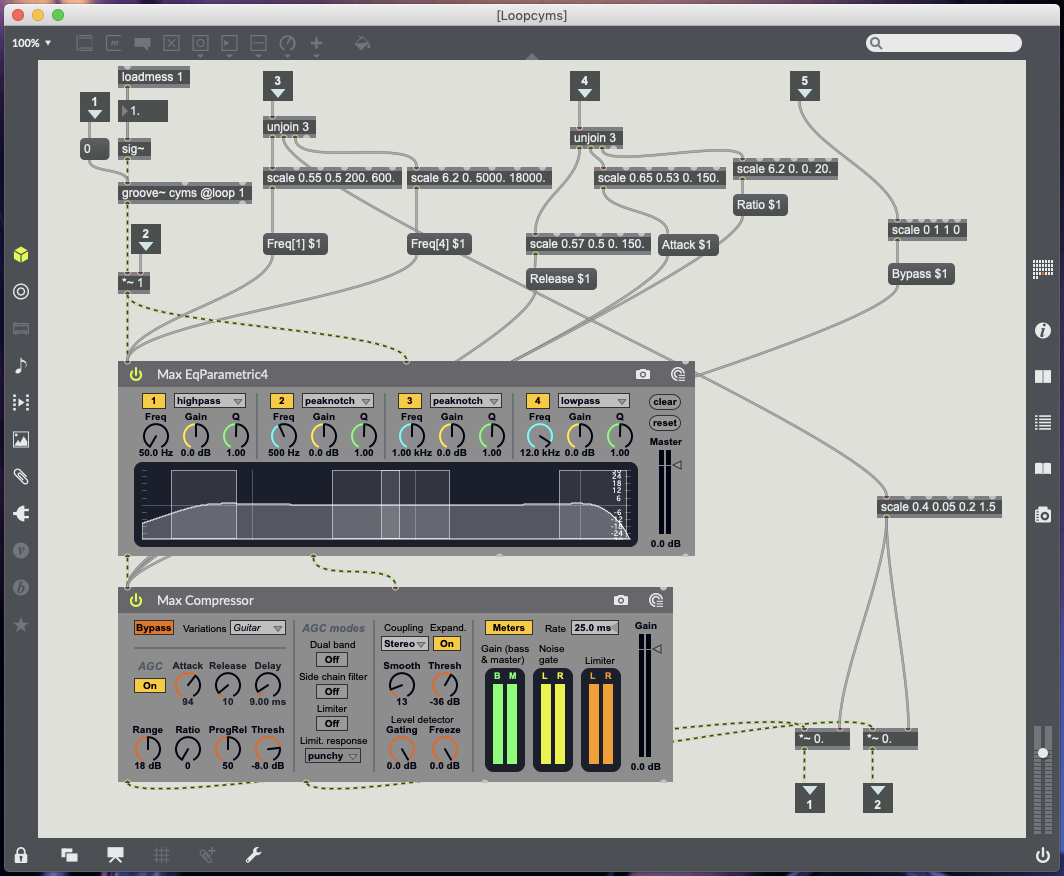
Cymbals (32) – Update Object sends 1 to volume to turn mute off, Remove Object sends o to volume to turn mute on (post Groove object pre plugins), X data controls high pass EQ (200Hz to 600Hz), Y data controls drum volume, Rotation controls low pass EQ (5000kHz to 18000kHz) (see Fig.5.5.).
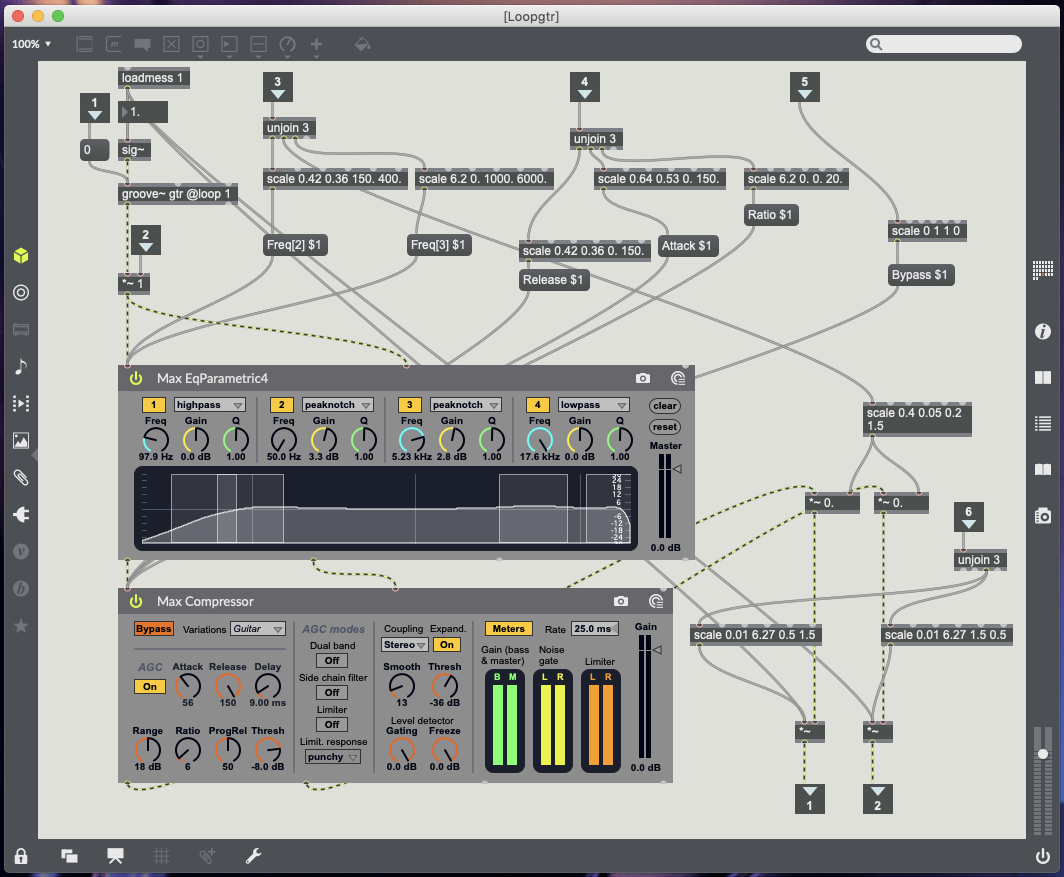
30 – Guitar – Update Object sends 1 to volume to turn mute off, Remove Object sends o to volume to turn mute on (post Groove object pre plugins), X data controls EQ peak notch (+3db) between 150Hz and 400Hz, Y data controls volume, Rotation controls EQ peak notch (+3db) between 1000kHz and 6000kHz (see Fig 5.6.).
23 – Bass – Update Object sends 1 to volume to turn mute off, Remove Object sends o to volume to turn mute on (post Groove object pre plugins), X data controls EQ peak notch (+3db) between 80Hz and 300Hz, Y data controls volume, Rotation controls EQ peak notch (+3db) between 1000kHz and 6000kHz (see Fig.5.7.).
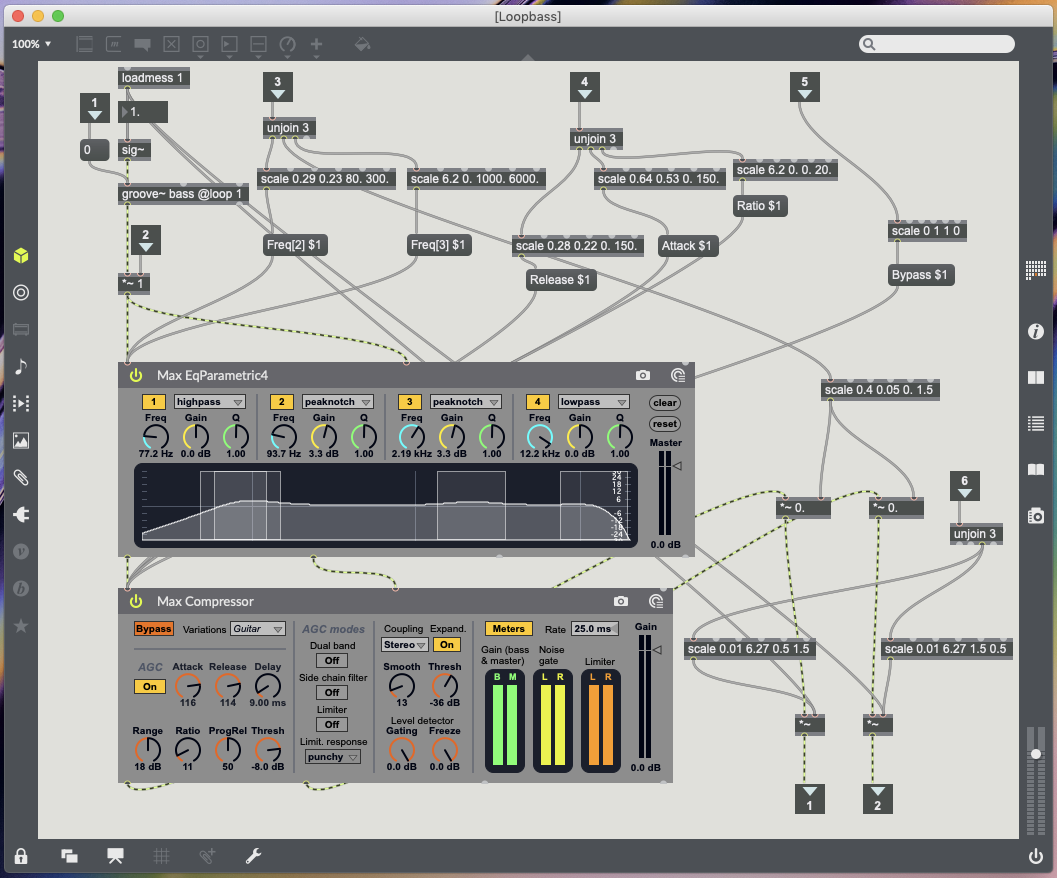
Compressor markers all work with the same movements. X data controls release time (move left for slow release time, move right for fast release time). Y data controls attack time (move to bottom for quick attack time, move to top for slow attack time). Rotation data controls ratio (Place marker facing upright with a slight tilt to the right for 0:1 ratio, keep turn right to increase ratio 20:1).
Compressor markers – 6 controls Kick & Toms (see Fig.5.3.), 18 controls Snare (see Fig.5.4.), 42 controls Cymbals (see Fig.5.5.), 11 controls Guitar (see Fig.5.6.), 54 controls Bass (see Fig.5.7.).
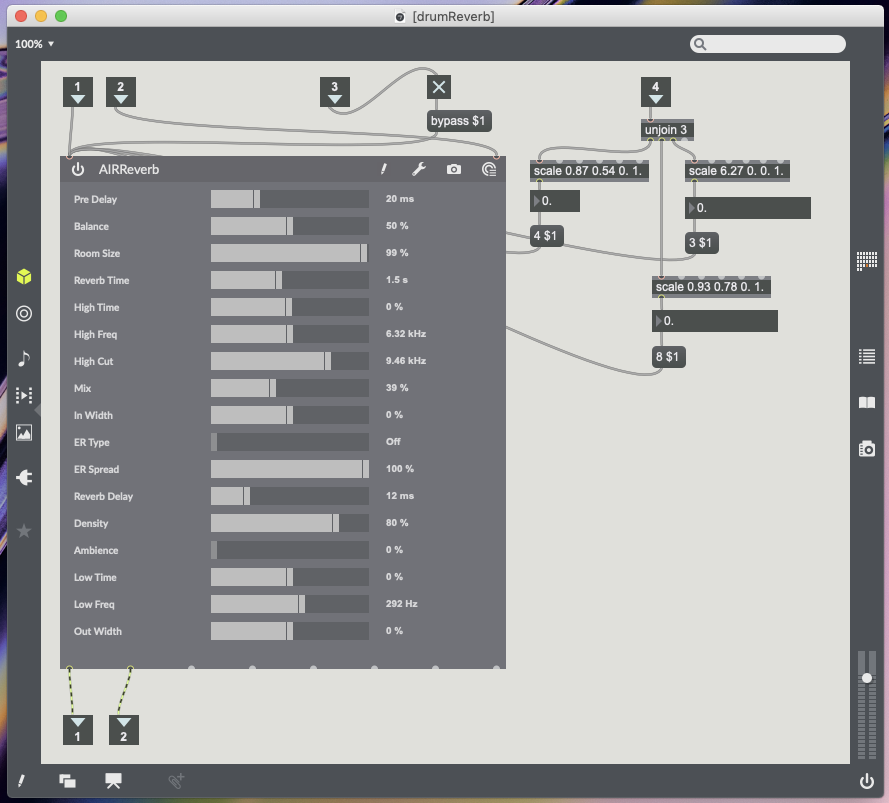
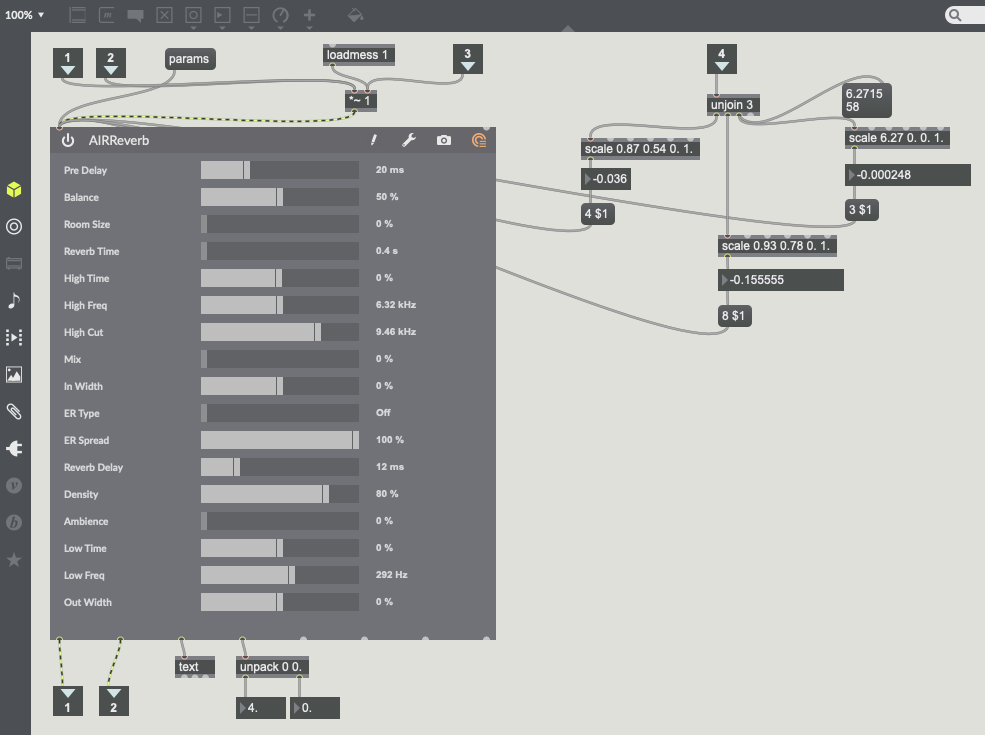
35 – Reverb Marker – Placing marker activates reverb and removing marker bypasses reverb. X data controls reverb time (Moving to the right increases reverb time left reduces reverb time). Y data controls reverb mix (Moving up increase wet/dry mix and moving down decreases wet/dry mix). Rotation data controls room size (Placing marker upright slightly to the right is smallest room size 0%, Continue turning right to increase room size 100%) (see Fig.5.8.).
83 – Chorus marker for guitar and bass only – Placing marker activates chorus and removing marker bypasses chorus. X data controls chorus rate (Moving right increases rate and moving left decreases rate). Y data controls mix (Moving up increase chorus mix moving down decreases). Rotation data controls chorus depth (see Fig.5.9.).
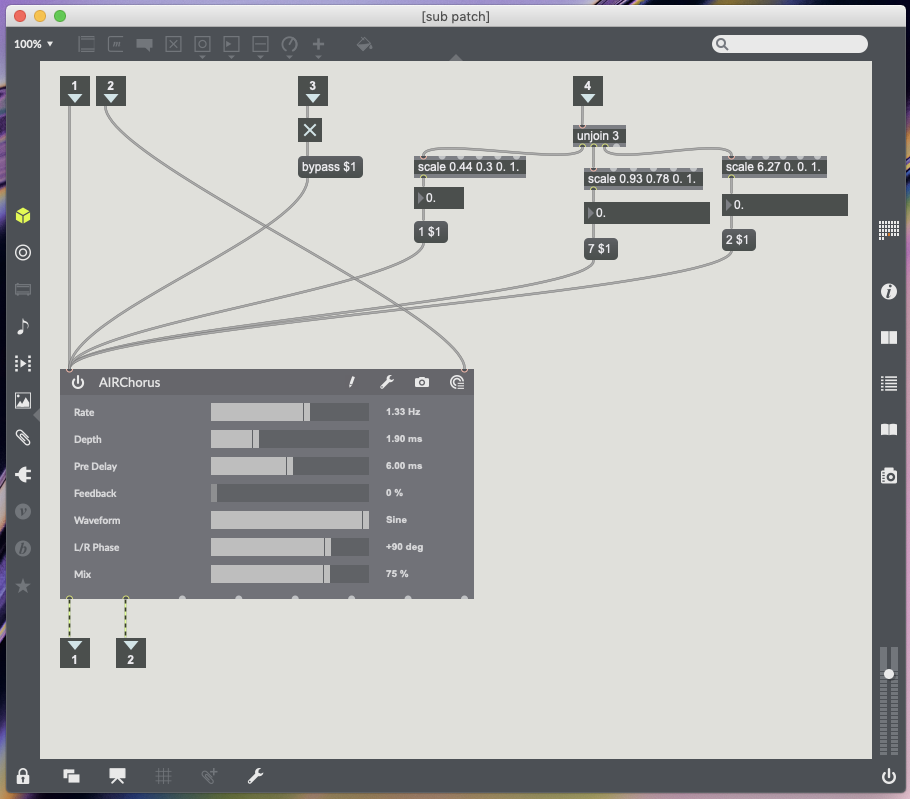
71 and 34 – Instrument panning for guitar (71) and bass (34) only – These markers can be placed anywhere on the table as the only data being processed from them is the rotation data. This controls two multiplication objects so guitar and bass can be panned left and right (see Fig.5.6. for guitar and Fig.5.7. for bass).
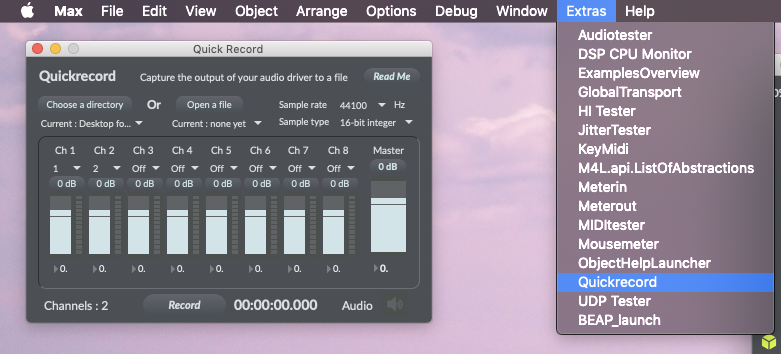
The last feature I wanted from this patch was the option to record the the mix being created in Logic Pro X or any DAW Soundflower is an audio driver, created by Cyling74, which can be used to route audio between different computer applications by creating a virtual audio interface (Lee, 2013). Soundflower is a useful tool to have installed on your system, however, I have found on my computer there is a compatibility issue. All audio becomes glitchy once Soundflower is activated and any recordings made will have these glitches. Unable to find a fix, which is likely due to the age of the driver, the best alternative is already built into Max. Max has a quick record function which allows you to record from selected audio outputs (Cycling’74, 2011) (see Fig.5.10.). Once your session has been recorded you can import the audio file into any DAW.
My Computer – Mac Mini (late 2014) running macOS Mojave 10.14.4 with Focusrite Scarlett 2i4 2nd generation audio interface.
References.
Admin, 2018. Soundflower for macOS Mojave (and sierra high sierra). [Online] Available at: https://www.fluxforge.com/blog/soundflower-os-x-10.11-10.12-macOS-sierra/ [24/04/2019].
Cycling’74, 2011. Did You Know #30: Quick Record. [Online Video] Available at: https://www.youtube.com/watch?v=-PVSSv8nw2w [25/04/2019].
Cycling74, 2019. Scale Reference. [Online] Available at: https://docs.cycling74.com/max7/maxobject/scale [25/04/2019].
Cycling74, 2019. Sending and receiving audio from logic. [Online] Available at: https://cycling74.com/forums/sending-and-receiving-audio-from-logic [24/04/2019].
Lee, H., 2013. Quick Tip: Routing Audio Between Application Using Soundflower. [Online] Available at: https://music.tutsplus.com/tutorials/quick-tip-routing-audio-between-applications-using-soundflower–audio-16199 [24/04/2019].
Using ReacTIVision to Control Plugins within Max.
Max allows users to work with built in audio units, as well as, a users own audio plugins which are already installed on their computer (see Fig.4.1.).
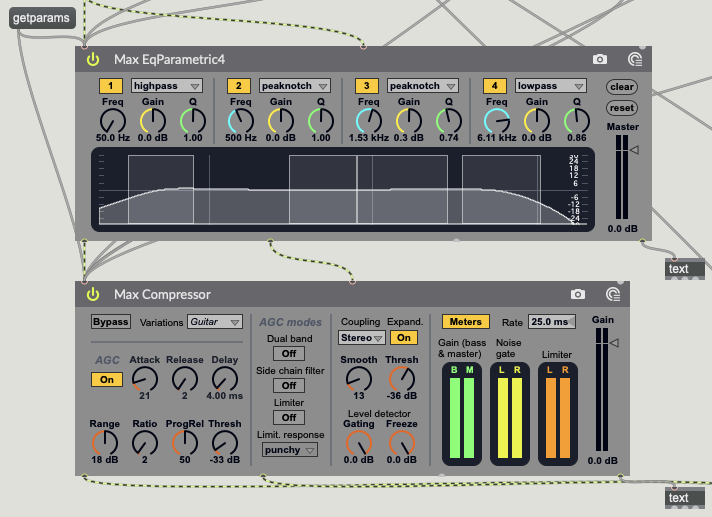
The amxd~ object is used to load a Max for Live object and covers a range of plug-ins from reverb to compression (Cycling74, 2019). In order for these plug-ins to work with the data being sent from the TuioClient, you first need to know which parameters of the plug-ins are controllable. Using the message “getparams” will send a list of all the plug-in parameters to the far right output of amxd~, this can be read using a text object, which will collate and formate the message into a line of data (Cycling74, 2019) (see Fig.4.2.).
The vst~ object works in a very similar way to the amxd~ object. Parameters can be obtained using the message “params” and can be read via the same text object (Cycling74, 2019). The main difference between the two objects is the user interface within Max. The vst~ object has a different user interface as amxd~ objects have been pre-programmed to work in Max (see Fig.4.3.).

It is now that object parameters can start to be mapped to TuioClient data (X, Y and Rotation Data). Using a message box with a parameter name followed by a dollar sign and the number one (e.g. Attack $1) allows for an arguments value to be changeable (Cycling74, 2019). This works very efficiently with amxd~ objects (see Fig.4.4.) but not so well with vst~ object. I have found that vst~ object parameter names do not work within the message boxes and are not recognised. With vst~ objects the parameters are numbered not named. Use a message box with the number of the parameter you want to change (e.g. 5 $1) (Cycling74, 2019) (see Fig.4.5.).
References.
Cycling74, 2019. amxd~ Reference. [Online] Available at: https://docs.cycling74.com/max7/maxobject/amxd~ [18/04/2019].
Cycling74, 2019. Audiounit~ Reference. [Online] Available at: https://docs.cycling74.com/max7/maxobject/vst~ [18/04/2019].
Cycling74, 2019. Message Reference. [Online] Available at: https://docs.cycling74.com/max7/maxobject/message [18/04/2019].
Cycling74, 2019. Text Reference. [Online] Available at: https://docs.cycling74.com/max5/refpages/max-ref/text.html [18/04/2019].
Building A Max Patch Part 2.
Now that information is being sent into Max, via the TuioClient, this information needs to be routed and separated into individual data points. This way the information is more useful than the list the TuioClient sends into Max.
The first thing is to understand and route the fiducial marker data. The data I have used is listed in the following way;
1 = update and remove object (when camera recognises an object and when it is removed).
2 = Marker Counter (counting when an object is recognised and removed).
3 = Fiducial Marker Number.
4 = X data (Left and Right Position).
5 = Y data (Up and Down Position).
6 = Rotation Data.
By using the route object messages can be organised by the objects arguments (Cycling74, 2019). The first route object allows me to organise data based on when the markers are recognised by the camera. From this point list information is the processed using the zl object. Using the slice and integer arguments the list is processed accordingly (Cycling74, 2019) (see Fig.3.1.).
In my patch the first route and zl slice objects are being used to process the list information to show me what objects are being recognised and removed, as well as, then slice the list information from the first data point. Doing this allows me to remove the update/remove object count number, which I have no use for, leaving me with information starting from the fiducial marker number.

Now that the list data from the TuioClient has been processed I am now able to use the markers X, Y and rotation data to control various objects within max. I have built the various controls within different sub-patches. By using the encapsulate command a sub-patch will be created grouping objects together and saving space within the main patcher window (Cycling74, 2019) (see Fig.3.2.).
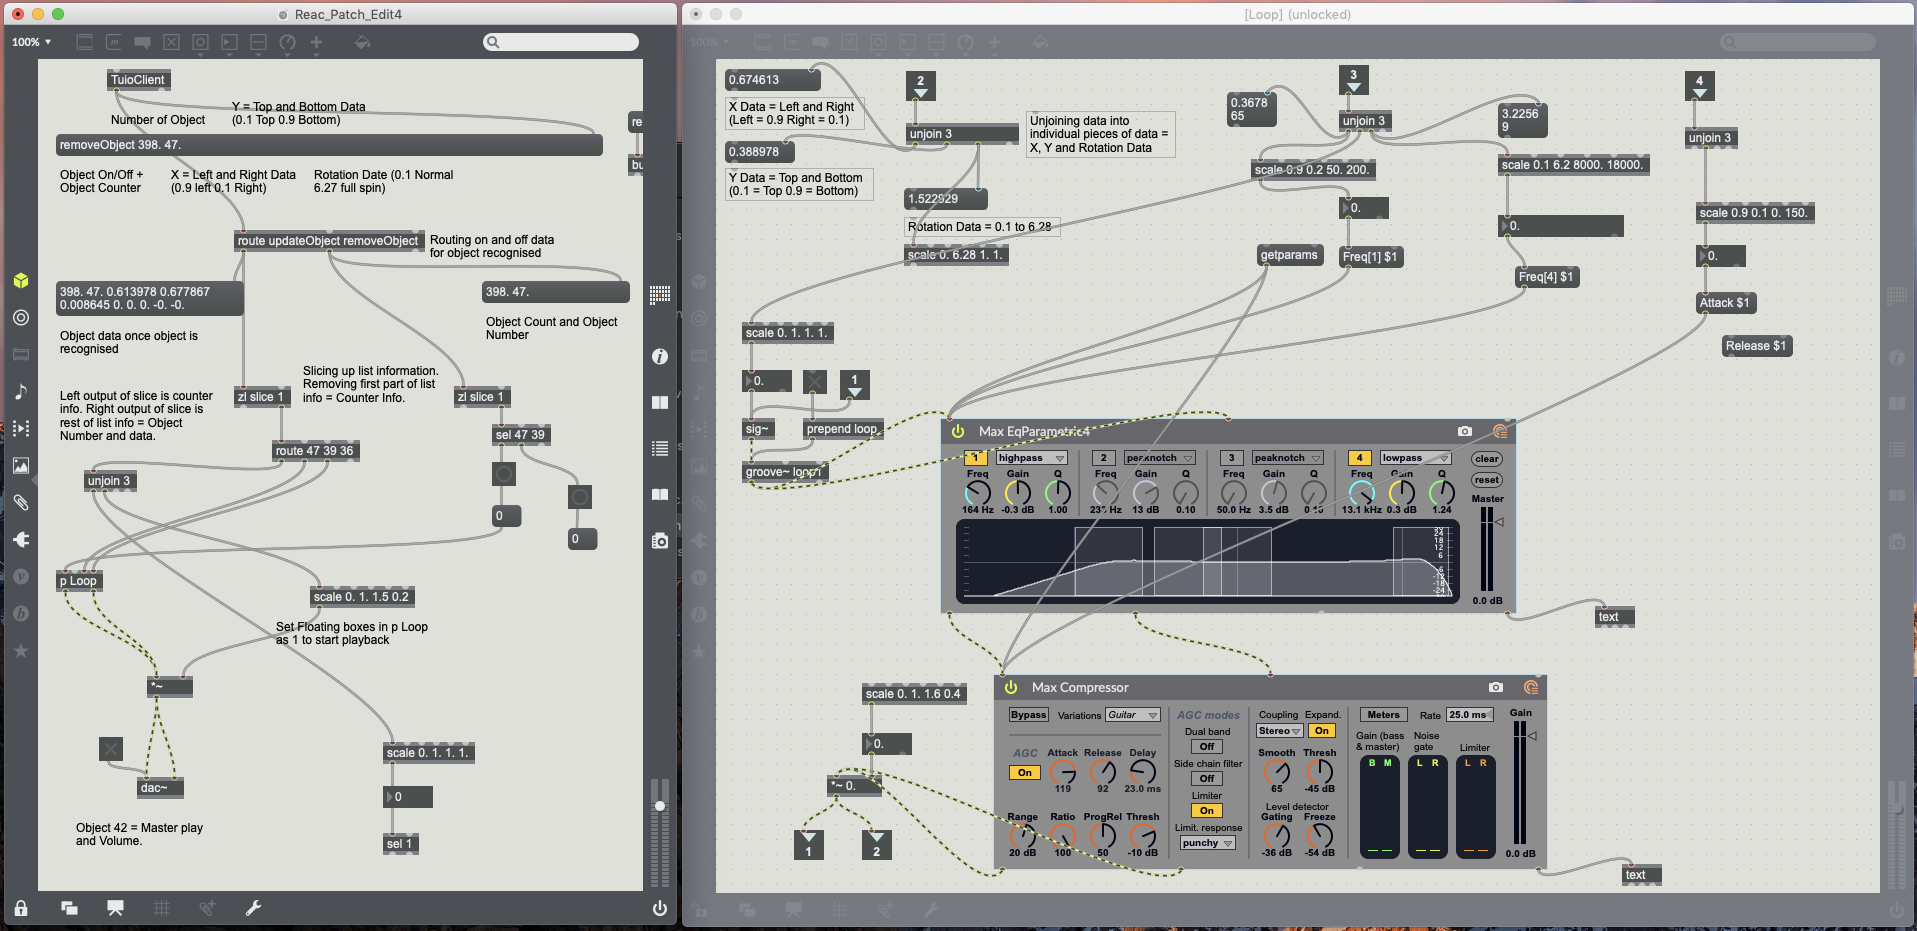
Although I have the data I now want to use to control objects within Max, it still needs to be processed into individual data points and converted to the correct integer or floating point values. Using the Unjoin object breaks lists into individual messages/values (Cylcing74, 2019). This allows for the individual markers X, Y and rotation data to now be processed separately from each other. This information is received in Max as floating point data in the follow way;
X = 0.01 (Right) to 0.99 (Left)
Y = 0.01 (Top) to 0.99 (Bottom)
Rotation = 0.01 to 6.27
Not all plugins and objects within Max will work to these data values/ranges. Using the Scale object allows any input value, integer or floating point, to be converted to larger or smaller values, integer or floating point (Cycling74, 2019) (see Fig.3.3.).

References.
Cycling74, 2019. Encapsulate and De-encapsulate Reference. [Online] Available at: https://docs.cycling74.com/max7/vignettes/encapsulate_deencapsulate [18/04/2019].
Cycling74, 2019. Route Max Reference. [Online] Available at: https://docs.cycling74.com/max5/refpages/max-ref/route.html [16/04/2019].
Cycling74, 2019. Scale Reference. [Online] Available at: https://docs.cycling74.com/max7/maxobject/scale [18/04/2019].
Cycling74, 2019. Unjoin Reference. [Online] Available at: https://docs.cycling74.com/max7/maxobject/unjoin [18/04/2019].
Cycling74, 2019. zlSlice Max Reference. [Online] Available at: https://docs.cycling74.com/max7/maxobject/zl.slice [16/04/2019].
Building A Basic Max Patch.
The basics of my reacTIVision patch is taken from what I built in the fourth week of lectures at the university (see Fig.2.1.).

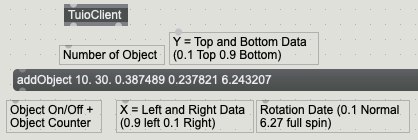
The reacTIVision framework works via a stand alone application which uses a real time video stream too quickly and robustly tracks fiducial markers, transmitting the markers states via a local network, providing data which can be interpreted by the TUIO client (Kaltenbrunner and Bencina, 2005) (Fig.2.2.).

Fiducial markers are placed on a translucent table top and beneath the table a camera captures images. These images are processed and determine the identity, orientation and location of individual fiducial markers (Bencina and Kaltenbrunner, 2005). The data that is captured is translated into floating point number data (see Fig2.3.). This floating point data is what I can use to control other object parameters within Max.
References.
Bencina, R., and Kaltenbrunner, M., 2005. The Design and Evolution of Fiducials for the reacTIVision System. [pdf] Barcelona: Audiovisual Institute Universitat Pompeu Fabra. Available at: https://modin.yuri.at/publications/reactivision_3rditeration2005.pdf[16/04/2019].
Kaltenbrunner, M., and Bencina, R., 2005. reacTIVision: A Computer-Vision Framework for Table-Based Tangible Interaction. [pdf] Barcelona: Audiovisual Institute Universitat Pompeu Fabra. Available at: https://modin.yuri.at/publications/reactivision_tei2007.pdf [16/04/2019].
Building a Reactable.
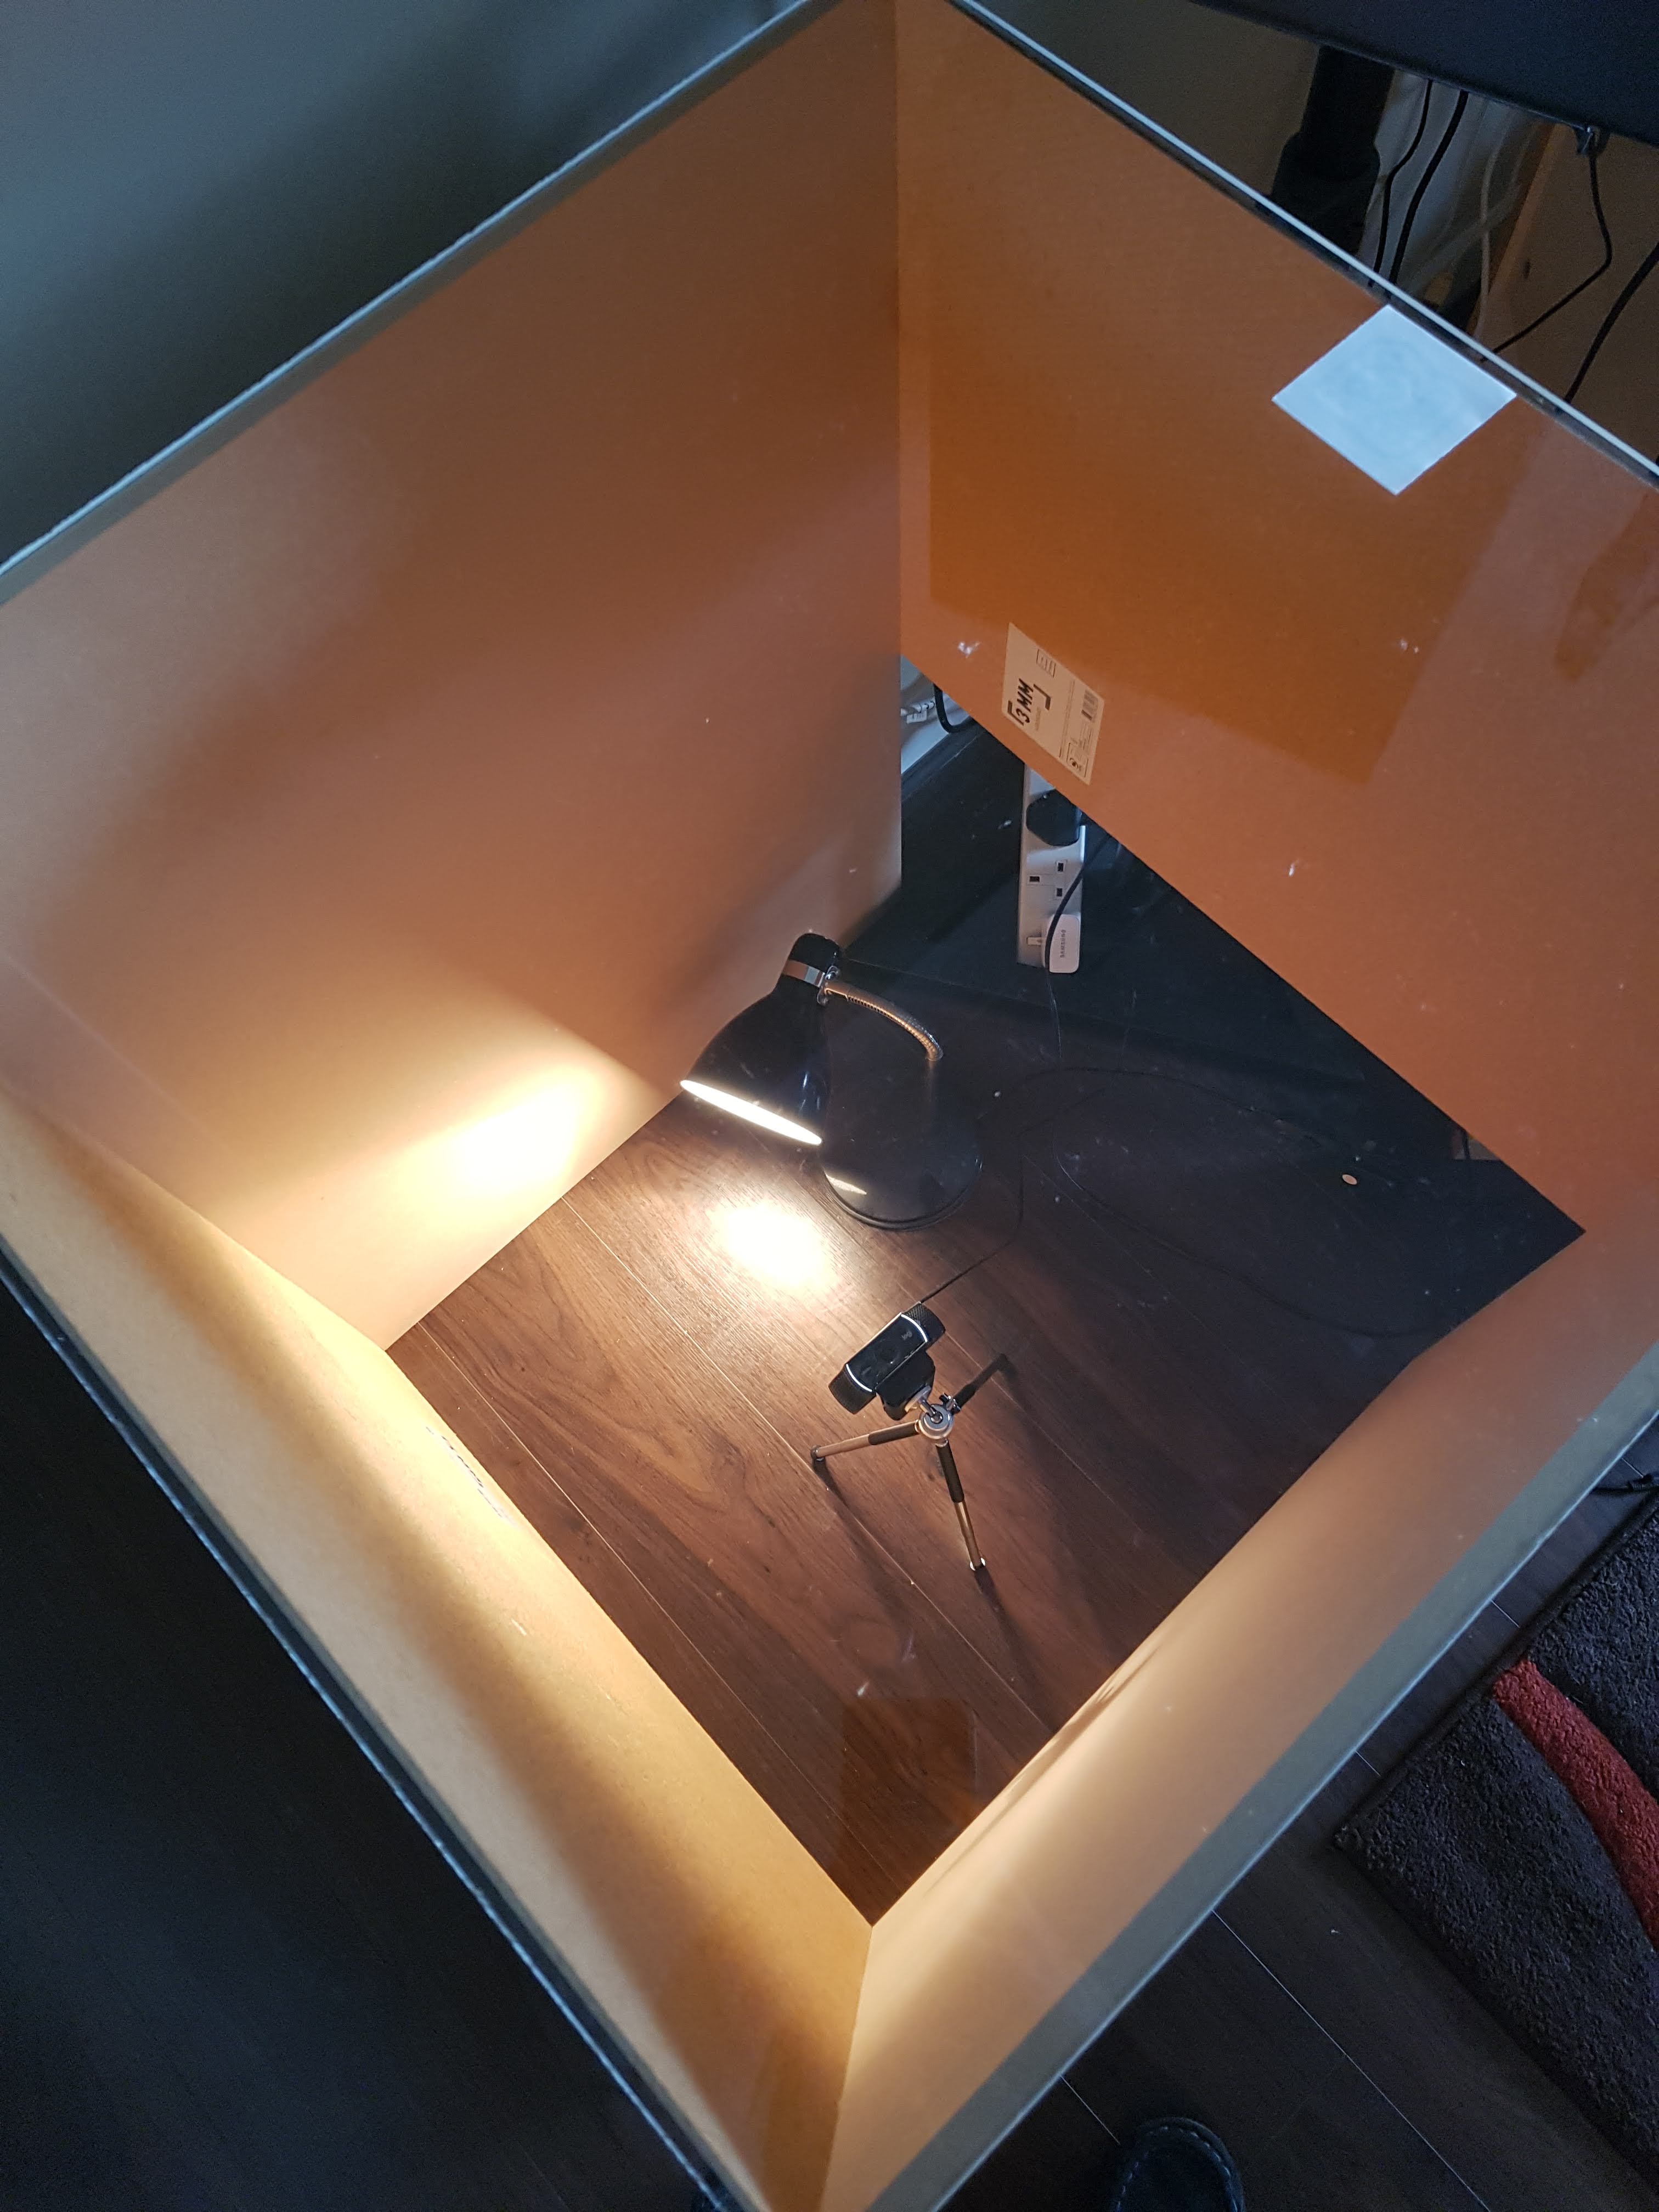
Building a Reactable can be as simple or as complicated as a designer would like. For my design I have created a table which is 880mm in hight and has a 610mm by 610mm clear top (see Fig.1.1.). This provides enough space for hardware to be placed inside the table and also allows enough surface area for items to be placed on the clear top.

A camera and projector need to be placed underneath the table with the correct lighting so that graphics can be displayed and the camera can capture markers correctly (Reactable Systems SL, 2019).
As my Reactable will not be used as a synthesizer and displaying graphics, I will only need a camera and lighting within my table (see Fig.1.2.).
References.
Hanson, M., 2014. How to Build a Reactable. [Online] Available at: http://micaelee.com/build-reactable/ [03/04/2019].
Reactable Systems SL., 2019. Reactable. [Online] Available at: http://reactable.com/ [03/04/2019].
ReacTIVision Controller.
Project Proposal
Nicholas Alex Thom – 10566736.
I am interested in working with the reacTIVision open source computer vision framework with the view of creating a multi-touch surface controller that can be used by musicians as an interactive mixing console. The aim of this project is to create an alternative user controller, rather than a mouse and keyboard, to control various mixing functions, such as, volume, Equalization, compression etc. Until more recent times many electronic user interfaces had been focused around the keyboard, that mostly operate as a MIDI controller, leaving a substantial amount of instrumental and none instrumental musicians at a loss when faced with a computer (McGill University, 2003). The reacTable is a multi-user electro-acoustic instrument with a table top user interface, an instrument which has been designed for novice and advance musicians by combining physical representation with control, allowing for multiple users to share control of musical parameters by moving physical artefacts upon the table surface (Jorda, et al., 2014). Now days, there can be many benefits for the musician to use an alternative mixing controller system. Use within the studio environment would allow mixing engineers the freedom to intermingle with the artists, building a closer relationship to artists and understanding the creative processes, a skill which can also be transferred into a real-time live performance, allowing the additional creation of unique mixes and allow for multi-user participation (Selfridge and Reiss, 2011). The reacTable has two main variations for use. One which is designed for the advanced user, providing controls to a sophisticated and precisely controllable synthesizer, and the other, which has been designed to be more playful for entertainment and educational use (Kaltenbrunner, et al., 2006). The reacTIVision framework is a great way for me to explore using physical motion as control and apply this to the mixing process.
In this project I aim to use the open source reacTIVsion framework to create a reacTable style multi-user interface, which will be able to play back audio and manipulate various different data points, allowing user control of audio and audio effects. This type of device will be created to be used as a type of mixing controller for a musician/mix engineer to use and experiment with as a creative alternative to a computer mouse and keyboard. The programming will be done using to software Max MSP with the reacTIVision software. I currently plan to only use Max for audio and effects processing as well as, the data processing for the reacTIVision. However, I do plan to explore how this could be linked into a DAW such as Logic Pro and how this style of controller could be used in a DAW. The main concerns I have with a project like this is establishing how each piece of software will communicate with each other and if they will be reliable. Having already experimented with a webcam and reacTIVision at home and encountered errors adding more pieces of software in could likely make this project very complicated very quickly.
Bibliography
Jorda, S., Kaltenbrunner, M., Geiger, G., and Alonso, M., 2006. The reacTable: A Tangible Tabletop Musical Instrument and Collaborative Workbench. [pdf] Music Technology Group Pompeu University. Available at: https://www.researchgate.net/publication/247929547_The_reacTable_a_tangible_tabletop_musical_instrument_and_collaborative_workbench [13/03/2019].
Kaltenbrunner, M., Jorda, S., Geiger, G., and Alonso, M., 2006. The reacTable: A Collaborative Musical Instrument. [pdf] Music Technology Group Pompeu University. Available at: https://ieeexplore-ieee-org.plymouth.idm.oclc.org/stamp/stamp.jsp?tp=&arnumber=4092244 [13/03/2019].
McGill University, 2003. New Interfaces for Musical Expression. [pdf] McGill University. Available at: http://citeseerx.ist.psu.edu/viewdoc/download?doi=10.1.1.309.7863&rep=rep1&type=pdf#page=82 [13/03/2019].
reacTIVision, 2019. reacTIVision 1.5.1. [Online] Available at: http://reactivision.sourceforge.net/ [13/03/2019].
Slefridge, R., and Reiss, J., 2011. Interactive Mixing Using Wii Controller. [pdf] Audio Engineering Society, Available at: http://www.eecs.qmul.ac.uk/~josh/documents/2011/SelfridgeReiss-2011-AES130.pdf [13/03/2019].
